안드로이드용 구글맵이 업데이트되면서, 조금 더 유연한 레이아웃 배치 지원을 위해 기존의 MapView+MapActivity의 조합 대신 프래그먼트(MapFragment) 형태로 사용하도록 변경되었습니다. (기존의 MapView를 바로 사용할 수도 있지만, 액티비티/프래그먼트의 생애주기 메서드와 연동 작업이 필요하므로 가급적 MapFragment를 사용하는 것을 권장합니다)
그런데, 프래그먼트가 안드로이드 3.0부터 등장한 클래스이기에 안드로이드 2.3(진저브레드) 이하 단말기에서는 이를 사용할 수 없습니다. 때문에 구글에서는 안드로이드 3.0 미만 단말기에서도 프래그먼트를 사용할 수 있도록 별도의 라이브러리를 제공하고 있고, 구글맵에서도 이를 지원하기 때문에 안드로이드 2.3 이하 단말기에서도 새로운 구글맵을 사용할 수 있습니다.
프로젝트 준비하기
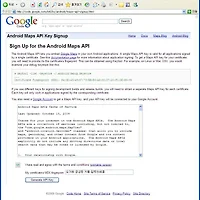
안드로이드용 구글맵 V2를 사용하기 위한 기본 준비가 필요합니다. (권한 설정, API Key 등록 등)
자세한 방법은 다음 포스트를 참조하세요.
SupportMapFragment 사용을 위한 준비
SupportMapFragment는 안드로이드 2.3 이하 단말기에서 사용할 수 있는 프래그먼트 클래스(android.support.v4.app.Fragment - Support library v4에 포함되어 있음)를 사용합니다. 따라서 기존에 Support library에 있는 프래그먼트를 사용하는 방식과 동일하게 사용하면 됩니다.
먼저, Support library를 사용하기 위해 프로젝트 속성(Properties) > Java Build Path > Libraries > Add JARs... 버튼을 클릭합니다. 다음과 같이 JAR Selection 창이 표시되는데, 여기에서 프로젝트 폴더 내의 /libs/android-support-v4.jar를 선택합니다.

다음과 같이 Support library가 등록됩니다.

레이아웃 및 액티비티 작성
이제 액티비티에 표시할 레이아웃을 다음과 같이 작성합니다. class에 com.google.android.gms.maps.MapFragment 대신 com.google.android.gms.maps.SupportMapFragment를 넣어주면 됩니다.
<RelativeLayout xmlns:android="http://schemas.android.com/apk/res/android"
    xmlns:tools="http://schemas.android.com/tools"
    android:layout_width="match_parent"
    android:layout_height="match_parent"
    tools:context=".MainActivity" >

     <fragment
        android:id="@+id/map"
        android:layout_width="match_parent"
        android:layout_height="match_parent"
        class="com.google.android.gms.maps.SupportMapFragment" />

</RelativeLayout>
다음, 액티비티를 작성합니다. 프래그먼트를 사용할 수 있도록 Activity 대신 FragmentActivity를 상속하고, getFragmentManager() 대신 getSupportFragmentManager()를 사용하여 FragmentManager의 인스턴스를 받아 프래그먼트를 찾도록 합니다.
package com.androidhuman.example.mapsv2support;

import android.os.Bundle;
import android.support.v4.app.FragmentActivity;
import android.view.Menu;

import com.google.android.gms.maps.GoogleMap;
import com.google.android.gms.maps.SupportMapFragment;

public class MainActivity extends FragmentActivity {

	GoogleMap mGoogleMap;

	@Override
	protected void onCreate(Bundle savedInstanceState) {
		super.onCreate(savedInstanceState);
		setContentView(R.layout.activity_main);

		mGoogleMap = ((SupportMapFragment)getSupportFragmentManager()
						.findFragmentById(R.id.map)).getMap();
	}

	@Override
	public boolean onCreateOptionsMenu(Menu menu) {
		// Inflate the menu; this adds items to the action bar if it is present.
		getMenuInflater().inflate(R.menu.activity_main, menu);
		return true;
	}

}
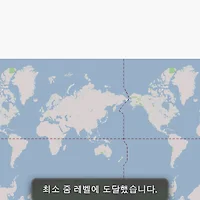
모든 작업이 끝났습니다. 프로젝트를 실행하면 다음과 같이 지도가 잘 표시되는 것을 확인할 수 있습니다.

포스트에서 사용한 예제 프로젝트를 아래에 첨부하였습니다. 참고하실 분은 참고하세요~~
예제 프로젝트
Github : https://github.com/kunny/blog_samples/tree/master/Android/2013-01-13_Google_Maps_V2_Support
Download : ![]() Mapsv2Support.zip
Mapsv2Support.zip
'위치 기반 서비스 사용하기 > 구글 지도 (Google Maps)' 카테고리의 다른 글
| Google Maps Android API v2 사용하기 (인증 및 초기설정, 지도 띄우기) (186) | 2016.04.08 |
|---|---|
| 구글맵 API 활용하기 - (2) 구글맵 띄워보기 (74) | 2010.01.08 |
| 구글맵 API 활용하기 - (1) MD5 Fingerprint 생성, API Key 발급받기 (46) | 2010.01.08 |
| 구글맵 API 활용하기 - (3) 지도에 확대/축소 기능 추가하기 (47) | 2009.11.12 |